|
|
|
FileMatrix Online HelpHelp, how-tos, questions and answers, known errors
|
|
|
|
|
|
Basic helpThough the user interface of the program is intuitive, before you start using it, you should be familiar with a few basic features.
Definitions of terms "LMB" = left mouse button. "RMB" = right mouse button. "MMB" = middle mouse button. Active file = the main focused file. Active column = the column which contains the active file. File title = the full name of a file: path, name, extension.
Basic mouse operations Double click with the left button of the mouse on a file: open the directory or run the file. Click with the left button of the mouse on a file and drag the mouse: show the "File-drag" menu. Use this menu for operations on files, which need a source and a destination directory, like: copy, move. Click with the right button of the mouse on a file: show the "File" menu. Use this menu for operations on files, which need only a source, like: delete, view, edit, search. Click with the right button of the mouse on a file and drag the mouse a small distance: show the "Mouse" menu. This menu let's you access fast some of the operations which can be performed on a file. In order to perform an operation from this menu, you have to release the mouse button when the mouse cursor is over the item of the menu which displays the name of the operation. Click with the middle button of the mouse on a file: toggle the selection of the file. Drag a directory name from the directory tree navigator and drop it into a column to display the content of the directory in that column.
Mouse menuWhen you click the right button of the mouse on a file (in a column), and then drag the mouse a small distance (value which is called sensitivity), the mouse menu is displayed. When you release the mouse button over one of the menu items, the associated mouse operation will be performed.
Various features If you want to go to the parent directory of a directory displayed in a column, click on the column's button which shows the directory title, located at the top of the column. If you want to navigate in your file system using a directory tree, you can display a directory tree dialog with a "MMB" on the button (at the top of a column) which displays the current directory. You can also display this dialog using the "File \ Navigate \ Tree navigator dialog" menu. You can find the context menu of the system (the menu normally displayed when you make a right-click on a file) under the name "System" menu. This can be displayed from the mouse menu or with a right-click on the file type field (if the type is visible or simulated). If you display or simulate (this is by default) the file type field (see the "Options" dialog, "Show file type"), you can perform additional operations by directly clicking a mouse button on this field. See the "Mouse operations" tab in the "Options" dialog, to see how you can change these operations. When you move the mouse cursor over a visual control, a hint is displayed at the bottom of the main window, which describes what that control does when used.
SkinsOne key feature of skins is that the controls have translucency. By default, the translucency is not active because slow computers may exhibit delays in rendering the main window. In order to change the translucency, enter in the skin editor ("Skins \ Edit") and go to the "Translucency" tab. Each translucency parameter can have values from 0 (opaque) to 100 (transparent).
Translucency effects are most impressive when there is a background picture. On high quality monitors, these effects are stunning.
Translucency of columns By default, the columns are opaque, that is, their backgrounds have the background color for windows. In order to make them translucent, go to the skin editor, the "Translucency" tab, and increase the "Window background" parameter. Set it to 100 in order to make the columns transparent.
Password generatorThe password generator (see the "Work \ Gizmos \ Password generator" menu) helps you generate strong passwords which you can use anywhere. The main purpose of the dialog is to generate random passwords for you, passwords which you can use on the Internet, passwords which you don't need to remember (because you can store them on your computer). The function which generates the random numbers (used to generate random passwords) uses mouse movements to randomize more the output. The random number generator needs 256 mouse movements (over the main window of the program) to be fully randomly initialized. So, don't try to steg-in something (or use the password generator) without first moving the mouse over the columns (for a few seconds).
Hashing Write your text password in the "Password" edit-box of the dialog. Use the "Generate hash" button to generate a hash value of the password and place it in the edit-box (instead of your original password). Now, use this hash value where you need a password. Note that since FileMatrix uses standard hash algorithms, you can make your own program to hash your text passwords; so, you don't depend on FileMatrix. Also note that if you don't remember your text password or the number of hashing iterations, FileMatrix can't give you the hash value for it.
Source code The hash algorithms used by FileMatrix are in the source code archive. When you click the "Generate hash" button, this is what FileMatrix does: unsigned char sDigest[SHA160_DIGESTSIZE] = ""; sha160_gen_string(PasswordEdit->Text.c_str(), sDigest); WipeText(PasswordEdit->Text);
int sCount = GetIntFromComboBox(HashIterationsComboBox); for(int i = 0; i < sCount - 1; i++) sha160_gen_digest(sDigest, sDigest);
PasswordEdit->Text = BufferToHexa(sDigest, SHA160_DIGESTSIZE);
How-tosHow do I centralize my work? If you want to centralize your documents then use containers. This way you can centralize files (including directories) in a single place.
How do I do often searches in specific directories? Display a container in the "Search" board, in the first or second column (from the left). This way, you can use the "File \ Search \ Search file in home" or "File \ Search \ Search file in home 2" menu to start a search in that column. Copy, in that container, the directories where you want to make the search. You can also copy files in there. Make your searches in that column.
How do I create bookmarks to files? You can add the files you want to bookmark to a container using the "File \ Copy to container \ *" menu (or use "Shift + digit"). Then, when you want to go back to a bookmarked file, first display the container (in the column where you want to see the bookmarked file) using the "File \ Show container \ *" menu (or use "Ctrl + digit"), focus the desired file and then use the "File \ Container \ Go to file" menu (or "Ctrl + G"). The content of containers is saved, so you will always have access to the bookmarks.
How do I send files to removable drives? Let's say you want a quick way to grab files and put them on a memory stick.
Directly The easiest way is to use the "File \ Drop to directory \ Copy" or "File \ Drop to directory \ Move" menus. (The old name of the "Drop to directory" menu is "Drop to partition".)
Inter-board Another way is to use drag and drop between boards to display the "File-drag" menu. You can also drag a column and drop it on the "Show board" button. Then click the board where your terminal root is displayed in a column. Then click MMB on the type of the partition from the destination column to display the "File-drag" menu. In the destination column, from the "File-drag" menu, choose either "Miscellaneous \ Drop-copy" or "Miscellaneous \ Drop-move" to either copy or move the selected files from the source column.
How do I hide what directories I navigate into? If you share your computer user account with someone else and you don't want that someone to see what directories you navigate into, you can change the directory where the internal options of the program are stored, using the "File \ Attributes \ Special paths \ Mark Options" menu when that directory is displayed in the active column. If this special directory is on an encrypted partition, and the other people who have access to your computer user account don't have the password for the encrypted partition, the internal options of the program are protected. If other people start the program, FileMatrix will use the default directory for internal options (because the directory you specified can't be accessed by them), directory which doesn't contain the protected options.
How do I add descriptions / keywords to my pictures? Focus a picture file and use the "File \ View & Edit \ Edit description" menu. This will add a description stream to that file (file streams are available only if your operating system is at least Windows2000). The text editor is automatically started and you can write the description or keywords you want to associate with that picture. Later, when you want to find a picture which contains certain keywords, enter in the "Search file" dialog (use the "File \ Search \ Search file" menu), set the "File name filter" with "Picture files" (choose this value from the combo-box list), and set "Text filter" with the keywords you want to look for. If you want to search the words only in the description of the files, set "File parts" with "Description". Otherwise, set it with "Name, text" (which is the default value). You can also put your keywords in the names of the files.
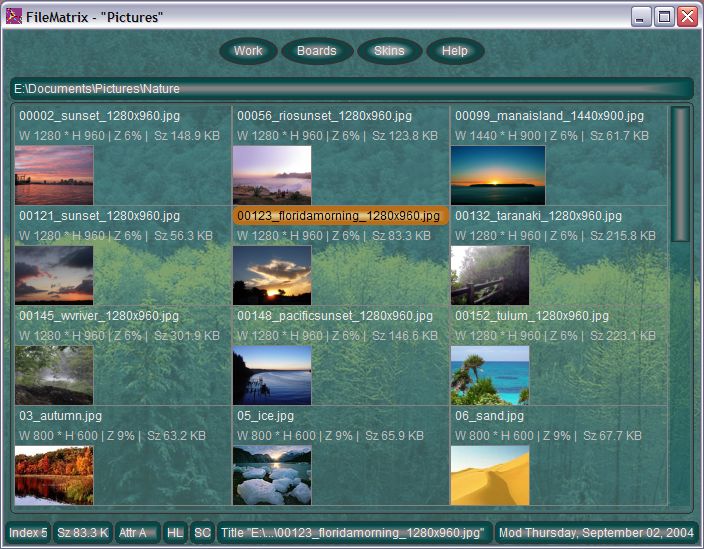
How do I browse my pictures?There are several ways to browse the pictures you have in a directory. One quick way is to view the thumbnails (check the "Thumbnails" attribute for the column with pictures).
Simple browser You can setup a thumbnail pictures browser in a board. Attributes: 1 column, 3 subcolumns, thumbnails.
Use the file hover feature to see a larger thumbnail for any file.
Picture preview You can setup a board (or use the predefined "Picture browser" board) to view the same directory with two different views: one with thumbnails, one with large pictures. Each column can still be navigated independently.
Choose a board you don't need for other things. Set the number of visible columns to two (use the "File \ Visible columns \ 2" menu). Set the width of the second column to 3 (focus the column and use the "File \ Attributes \ Width \ 3" menu). Set the thumbnail height of the second column using the "File \ Attributes \ Thumbnail height \ Fill" menu. Use the mouse wheel to simply scroll through the pictures. Move the mouse over the column you want to scroll and just rotate the wheel (there is no need to focus the column first – this is automatically done). When you want to focus, in a column, the file which is focused in the other column, just use the "File-drag \ Column \ Set with source column" menu (start the drag in the column which already has that file focused).
How do I sort downloaded pictures? If you use a download manager to download pictures from the Internet, the names of those pictures will probably become a mess because many pictures have the same name (and have to be renamed). Let's say you add the following files in the download manager, from website A: "name100.jpg", "name101.jpg", "name102.jpg. Then you add the following files in the download manager, from website B: "name100.jpg", "name101.jpg", "name102.jpg. Same file names. The download manager downloads the files from site A, then it downloads the files from website B and renames them: "name100.jpg" to "name1001.jpg", "name101.jpg" to "name1011.jpg", "name102.jpg" to "name1021.jpg". This means that you lose the original grouping by website (and thus, by subject) because the normal sorting mode in FileMatrix is by name (= alphabetically). The downloaded files would now be displayed in a column like this: "name100.jpg", "name1001.jpg", "name101.jpg", "name1011.jpg", "name102.jpg", "name1021.jpg". To reorganize them by website, you can use a simple trick. When a file is downloaded, it will have its creation date set with the date when its download started. Because the download manager downloaded the files as you added them, the creation dates of files from website B are bigger then the creation dates of files from website A. So, in the column where these files are displayed, change the sort mode with the "File \ Attributes \ Sort \ Created, old-new" menu. Now use the multi-rename function. Because this function renames files in the order they are selected, their new names will be alphabetically sorted (when you change the sort mode back with the "File \ Attributes \ Sort \ Name" menu) in the same order they are sorted now: by the time when they were downloaded.
How do I manage grouped pictures?In many cases, when you have many grouped pictures (that is, with the same subject), they are not named as you would like. Also, you may be unable to use the multi-rename function because you find them in time, scattered on your computer (this can happen particularly with downloaded pictures). You did, at some point, started to sort and rename them. Normally, for the names of a group of pictures you use a text prefix (like "Grand Canyon") and then add a number (like "005"); thus you form name like "Grand Canyon 005.bmp". But it's really annoying to have to use the "Move as" function because you have to know which name is the next name available. Is it "Grand Canyon 015.bmp" or "Grand Canyon 016.bmp" or "Grand Canyon 053.bmp"? There are some functions which will automatically generate this name for you. See the "File-drag \ More copy \ Copy as last numbered" and "File-drag \ More copy \ Move as last numbered" menus. They work like the "Copy as" and "Move as" functions, but they automatically fill in the field for the new name with the last numbered name available. For example, if the destination file is "Grand Canyon 005.bmp", if the last numbered file from the destination column is "Grand Canyon 023.bmp", then the source file will be copied with the new name "Grand Canyon 024.bmp" (regardless of its original name and of the name of the destination file). Note that the part of the name which prefixes the number must be the same.
If you want to locate the first of last numbered file, which is from the same group as the active file, see the "File \ Search \ Locate first numbered", "File \ Search \ Locate last numbered" menus. For example, if you use the function "Locate first numbered", if the active file is "Grand Canyon 015.bmp", if the first numbered file from the active column is "Grand Canyon 003.bmp", then this file will be focused. Note that the part of the name which prefixes the number must be the same.
How do I change the extensions of lots of files? Select the files that you want to rename. Enter in the "Multi-rename" dialog (press "Ctrl + N"). Set the "Extension" field with the new extension (don't include the dot). Press the "Rename" button.
Second example Select the files that you want to rename, or all files. Make sure none of the selected files contains (twice) in its name the extension you want to change (including the dot), as in: "some file name.ext and again.ext" (the name has to be "some file name and again.ext", else only the first ".ext" would be replaced). In the "Multi-rename" dialog, set the "Original text" field with the extension you want to change (include the ), and the "New text" field with the new extension. Press the "Rename" button.
How do I look for music? Go to the partition / directory where you want to look for music. Enter the "Search file" dialog. In "File name filter" choose "Audio files" from the combo-box list (or write it). Press "Enter" to start the search operation. After the search is complete, display the resulted files in a container (press "Put in Search container"). Move these files into your "Music" directory. Repeat these steps in all the partitions / directories you want to find music in. If you want, you can use "Clip titles" instead of "Search file". This way you will immediately have the file titles in the clipboard.
How do I compare files? Let's say you have 10 source files you want to compare with the files in the destination column. Select the 10 source files. Press "LMB" on the source file name and drag cursor into the destination column. Release "LMB". Choose "Compare" from the "File-drag" menu. Click "Okay". Now, the selected source files are compared with the destination column. In the destination column / directory you must have the same directories (with the same names).
File hashesFileMatrix can generate file hashes. A hash is a small string of (hexadecimal) characters which is computed from the content of some data (in this case, the content of a file). It represents a digital signature for the data that is hashed, and is used to verify the integrity of the hashed data. To generate a hash using FileMatrix, focus the file you want to hash and click the menu "File \ Miscellaneous \ Hash file". When you click the "Generate hash" button, the hash will be generated for that file and it will be put in the available edit-box, from where you can copy it. Let's say you download a file from the Internet and you want to be sure that you got the same file that the developer of the program uploaded on his website. If the developer has published on their website the hash of the file, you can verify that hash against the hash generated by FileMatrix for the file you downloaded. To do that, before you click the "Generate hash" button (see above), paste in the available edit-box the hash you want to verify. FileMatrix will generate the hash for the focused file and compare it with the text from the edit-box. If they are the same, FileMatrix will say so.
History of navigationFileMatrix keeps track of the files you launch or edit, and the directories you visit. Later, when you want to launch again a file that you previously used, or visit a directory that you previously navigated into, you can open the history search dialog (press "H"), type in a word or more that you remember are a part of the name of the file you want to access again, and press enter. FileMatrix searches the navigation history and shows you a list of files, sorted by rank, from where you can immediately access the desired file. Note: As long as the "Free-hand filter" check-box (from the search dialog) is checked, the search will work like an online search engine, that is, each word will be considered individually and the more words will match a file name, the higher in the results list will the file be displayed.
Questions and answersWhy doesn't the program run on WindowsNT4? FileMatrix requires that service pack 6 is installed on WindowsNT4.
Why doesn't the program run on my computer? If your computer has an operating system specified in the list of operating systems on which the program runs, you should try to close as many programs as possible and then run FileMatrix. Close especially those programs that start when your computer starts. This may be the cause because some of your programs require a great amount of resources, which combined with the needs of FileMatrix may result in a failure to run it. For example, FileMatrix, Wallperizer and TextReader don't work at the same time on Windows98 (first edition). Their combined resources seem to kneel this old operating system.
Why are menus horizontally centered to the mouse cursor? When a menu is displayed, if it is horizontally centered to the mouse cursor, your hand only needs to make a vertical movement to select an item, thus relieving it from the supplementary horizontal movement you would need to make if the menu would not be centered.
Why can't I see any thumbnails (or anything else) in a column? Reduce the thumbnail height. Columns display items only if their height can be displayed fully. So, if the height of a single item is bigger than the height of the column, nothing is visible in that column.
BugsFile streams If you try to copy a file (or convert a picture) that contains streams, to a partition that doesn't support file streams, the OS incorrectly reports a "Path not found" error even though the file is copied.
Encrypted files Bug in WindowsXP service pack 1 (SP1). I talked with someone at Microsoft and we succeeded to solve this problem. When you try to overwrite a file encrypted under WindowsXP (without SP1), with a file encrypted under WindowsXP SP1, you'll get an "Access denied" error and the destination file will be empty. The two versions of Windows use different default encryption algorithms, which is the cause of this problem. Also, do not rely on the "Overwrite all older" function because the destination file is "newer" (with a few seconds)! Note that this problem occurs with any file manager (WindowsExplorer stops the copying process in such a case), but some don't tell the user there was an error (though there was one); however, some file managers overwrite the destination files successfully because they use the classic copy method: read and write. So be careful or you might not even know that the destination file is empty! If you install SP1 and you have files encrypted when you didn't have SP1, it's recommend that you decrypt then re-encrypt your files; this way all files will be encrypted with the same (new) algorithm.
Various system errors If you set the active focus on a ".pif" file, in the active reference bar, the size of the reference is 0. Because of a bug with the pixel format of a source file, the pixel format of some converted pictures is 24 bit RGB (instead of the original one). The picture converter fails to work with some JPG pictures. The cause seems to be a weird format (probably the color format or compression scheme), though it seems to be a normal one (and the viewer has no problems rendering it): RGB24, size 2 megapixels, DPI 300. Saving such pictures (as simple bitmaps) with IrfanView first, leads then to successful conversion. There are some GIF pictures which are reported to have more pixels than they actually have. Also, they are not converted correctly to the BMP format. There seem to exist some pictures, 8 bit PNGs and GIFs, which, in some extreme circumstances, cause a complete shutdown of the repainting system. Probably these pictures are not properly loaded (internally) as 32 bit formatted pictures. If the "Viewer \ High quality thumb" option is unchecked, there are some pictures which are not correctly displayed as thumbs. This happens because, depending on the picture's size, a different API function is used by FileMatrix. In any case, unless you have a slow computer, you should check this option because it brings no advantages to keep it unchecked. When you move a non-encrypted (or non-compressed) file / directory on the same partition, in an encrypted (or compressed) directory, the file / directory will not be encrypted (or compressed). If you try to move an encrypted file to a partition that doesn't support encrypted files, the OS incorrectly reports a "Could not encrypt file" error and the file is not moved.
Other errors Sometimes the last modification time of a file is with a second bigger than the time displayed by the system (in the "Properties" dialog). The "System-drag" menu doesn't work with the destination directory (= it's the same as the source). The program may crash when you try to play some media files. This problem was not seen with the codecs installed by "Windows Media Player". Other codecs may crash the program because they are incompatible with MCI ("Media Control Interface"), which is used by the program to play media files. The duration of some media files is not correctly displayed. Sometimes the programs crashes when a number of media files are viewed while their thumbnails are being loaded. This happens when "View next" or "View previous" functions are used and the file to be viewed is not visible when the functions starts.
AnnoyancesThe "System" menu doesn't overlap the associated file name, but the "File" menu does. This is because "System" menu is displayed with low-level functions, but "File" menu uses C++Builder functions that don't allow the user to do what low-level functions do. In some cases, if the sound volume is too small (but not 0), the real volume will actually be very high; this "lowest limit" depends on the global real sound volume. This is why the sound volume has a predefined "lowest limit". If you change a removable partition while working within FileMatrix then the automonitor will fail because the system does not recognize the change. Sometimes, the automonitor function does not work (on older operating systems), or detects changes with delay, because of the way the system manages the storage cache. If in a column you have a directory and in another column you have displayed that directory's content, you would get errors when deleting, recycling, moving, renaming the directory, or even when you change its properties. This happens because the automonitor function uses that directory too (and some operating systems lock directories during monitoring). If WindowsXP themes are activated, the program starts visibly slower (than when themes are not active). To avoid this, FileMatrix will not use themes by default. To activate themes you must rename the "FileMatrix.exe.manifest_" file (from the program's installation directory) to "FileMatrix.exe.manifest". If a column (for example the first one in a group of 2 columns) has the sorting mode different than "Name", when you enter the parent directory in the first column, both columns of the group end-up having the same sorting mode (different than "Name"). This is logical (because the sorting mode of the first column is preserved, and the other column is actually a duplicate of the first one), but in some cases it could be annoying. The focused item in the directory tree navigator doesn't have round corners. The background of the directory tree navigator is always opaque, regardless of the translucency parameter of skins. Due to the combination between text antialiasing and thumbnail caching, the thumbnails for text and plugin-rendered files are not transparent. If they would be transparent, the text would look bad. In some cases, when the "System" menu is displayed and then closed, the item which had the hot-track before the menu was displayed may remain drawn as hot-track (even though it isn't). When some video files (MPEG, WMF) are played in the file hover window, the focus is lost. This is not a problem, but because of this, video files can't be started after the file hover window is displayed (which would give visual feedback that the media is about to start). Instead, they have to be started before, otherwise there would be some bad flicker when the media would start. Also, these files are played repeatedly (this is because the program is deactivated for a moment, after the media ends). When you want to drop files to other programs, if you move the mouse (while dragging it) over a board button, you can no longer drop files to another program. For thumbnails to be extracted from ".mpg" files, you have to rename them to ".mpeg". The arrow keys don't work in columns like they do in normal list-boxes. Mainly, they don't have repetition if you keep an arrow key pressed. If you want repetition, use the arrow keys from the numeric pad. |
|
|
|
|
|
|
|
|